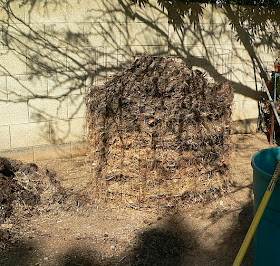
You will need about 8x4 feet of space for the assembled bin to allow room to rake around it and room to remove the compost later.
 | |
| Compost bin, almost full |
Compost Bin Materials: I use two sheets of "remesh", the welded wire mesh sold for reinforcing concrete slabs. If you know you want several bins, it's cheaper to buy a roll of remesh or other welded wire fencing (chicken wire is too flimsy). Each bin takes about 12 feet of mesh from the roll.
You also need a dozen or so sturdy wire fasteners to hold the remesh together. I use the fasteners called hog rings because I keep them on hand for fencing repairs. You can use paper clips, electrical wire, or anything that won't rust out or deteriorate while outside. Plastic cable ties, rope, or wire bag ties do not work.
Compost Bin Construction: Overlap the short side of the sheets by two meshes and fasten them with at least three fasteners down each edge to hold the sheets flat. Top, middle and bottom should suffice. If you have a roll of fencing, cut off 12 to 15 feet of it and make a cylinder. Bring the free ends together to make the circle, overlap them by a couple of meshes and fasten them along both edges.
Rake a spot clear and place your new compost bin on it. You will need to clean around the bin occasionally, so place it at least one rake-width away from any fence, building or plants. Place the bin to ensure you can easily reach one set of fasteners for removing the wire mesh after the compost is done.
I now line the bin with plastic poultry mesh to keep the fine materials in the bin and the birds out of it. You can add the mesh to the outside, or the inside - either way works.
If you want a less messy look, reed or bamboo roll privacy fence can be attached to the bin as a screen.
Filling the Compost Bin: Do not put a layer of sticks and twigs on the bottom of the bin in hopes of improving air circulation. The sticks will not decompose. All they do is make it harder to empty the bin. The wire mesh will allow plenty of air in as long as you don't fill the bin with pure grass clippings.
Pile materials into the bin as you collect them - you might be able to fill a bin with fallen leaves in one weekend, or it might take several months to fill it with a mix of kitchen waste and weeds. I can fill a bin in a weekend with the results of a pruning and shredding binge.
The only restriction on what you throw in the bin is that it can't be too "green". If you compost grass clippings or large amounts of fresh plant material, be sure to put layers of "brown" material like dried leaves, wood chips or other dry material between thin layers of the "green" material.
Water is the controlling factor in the composting process, so keep the material moist. I water my bins once a week or so by placing a small sprinkler head on top of them and watering the top of the material for 15 to 30 minutes. As long as the material is damp a few inches down, it's wet enough.
If debris falls out through the mesh, rake it up and throw it back in. The quail like to tunnel into the bins to make nests, the curved-bill thrasher digs holes in the sides looking for bugs, and I haven't figured out what the lizards are doing in there. I just clean up after them.
Caring for your Compost Bin: How do you turn the material in the bin? You don't. Keep the material moist and the center of the bin will compost itself. You can tell it's composting when the center of the cylinder sinks, the material is warmer than air temperature if you dig six or eight inches down, and the material is turning dark and crumbly. The outer part of the cylinder will not become compost, it stays fairly dry to insulate the inner part and conserve moisture.
Because of the dry climate I live in, I have to water my compost bins. A cheap sprinkler placed on top of the pile and run slowly for 15-20 minutes every few days is enough.
Harvesting the Compost: After six months to a year or so, your compost will be ready to use.
Water the bin well and also spray the sides to minimize billows of dust and mold spores. Cut the wire fasteners (not the mesh, the fasteners) on one side of the bin and pry the mesh loose from the compost. You can leave the compost like this for months until you need the compost. They might lean or even fall over, but compost doesn't have an expiration date.
Re-make the bin by fastening the free ends together and set it next to the cylinder. Any material that needs more time will be dumped in the empty bin for a second chance at becoming compost.
The outer six to nine inches of the top and sides will be mostly undecomposed material. The center of the cylinder should be dark, crumbly finished compost. With a spading fork, remove the top of the cylinder and the uncomposted material from the side. It usually peels off like a crust. Dump this material in the new bin.
 |
| Harvesting the compost |
Remove the finished compost material from the center of the cylinder, sift it to remove any big chunks that need more time and use the finished compost on your garden.
Cheap carabiner clips work really well for this. They are a lot easier to remove to open the bins for sifting. I use 3 per bin: top, middle and bottom.
ReplyDelete