Showing posts with label vegetables. Show all posts

Tuesday, January 8, 2019

Frost Cover Failure: Did They Live?

It's Flat and It's Freezing. Are they Frozen?

First there was this. Snow I should have prepared for, but didn't, flattened my frost cover. Then there was a spell of unusually cold weather for here, with the days at or barely above freezing and the nights well below freezing.

Left: Before
Right: After
I abandoned the leafy greens to their fate in the frozen wasteland and hoped the snow would be enough insulation to keep them from dying. I sat inside, sipping hot tea and snuggled with my cats, and waited.

Finally, after more than a week, the daytime weather warmed up a bit. The arches began to spring back up as the snow melted. It was looking like a snow snake's spine and I could see greens, although I couldn't tell if they were frozen dead greens or live greens.

Starting to Thaw, 10 Days Later
To see the thrilling finale of this cliffhanger ...
Read more!

Monday, December 3, 2018

How Do Frost Cloth Covers Trap Heat?


Garden Science

The leafy greens in the raised bed are thriving under the frost cloth tent. They've been planted out about a month and I am harvesting leaves. Harvest one leaf per plant and I can decorate a sandwich. Salads will come later.
One Month's Growth of Bok Choi

I always assumed that frost cloth worked by trapping heat under it, with stored heat from the ground keeping the air temperature above freezing. But I got curious and when I had the plants uncovered to water and weed them, I put a wireless remote thermometer under the tent.

Temperature? I recorded the temperature under the cloth and from an online personal weather station a block away periodically from 2PM until about 1PM the next day.
Read more!

Monday, October 29, 2018

Frost Cover Support: Rev 3.0 "Ladder Mesh"

The best version yet!

My first version of a frost cover support for winter vegetables was cobbled together in a hurry from available material with a cold front roaring down from Canada.  It was fast and effective but not convenient. The so-called "improved version" was not much better. This winter I took the time to think through the requirements for the supports before the freezes get here. Planning!  It works!

Improved Frost Cloth Support

Read more!

Tuesday, July 25, 2017

Storm Damage, Mostly Hail

Along with three inches of rain in two weeks we had a few short hail showers.  The rain was welcome. The hail was not excessive, but the damage it caused might make a novice gardener think they had a mysterious disease or leaf-eating pests.

Here's the first example, a chile pepper with the typical irregular holes punched by hailstones.
Holes from Hailstones

And the second, which looks like some sort of a disease, but is just spots of freeze damage where a small hailstone landed on the tender tomatillo leaves, stayed there, and melted.
Freeze Damage from Hailstones
Read more!

Thursday, July 13, 2017

Establishing Squash Bees in Your Garden

By the time honeybees get their lazy striped butts out of the hive and start their daily commute to my garden, squash bees have been at work for a couple of hours pollinating my squash.  There is so little pollen left that the honey bees seldom bother to visit the blossoms.
Squash Bee with pollen-covered legs

Squash Bee with distinctive narrow-striped abdomen
How do they do it?  Squash bees live where they work, and turn the blooms into a singles bar. The male bees hang around in the blossoms, waiting for unfertilized females to show up.  Towards noon the males and any unfertilized females enter a male blossom and let it close around them.  At dawn, when the next blossoms are opening, the bees chew through the walls of their overnight hostel and continue their search for a mate.
Withered male flowers are overnight refuges
Instead of a long commute back to a hive with the pollen, a fertilized female squash bee digs a nest close to the squash plants.  She stuffs one of the chambers with pollen, lays one egg on the pollen and seals that chamber.
Squash Bee with pollen-covered legs
The fertilized females spend the afternoons digging nest chambers to fill with pollen the next day. They live in a nest until the chambers are all complete, then make a new one.
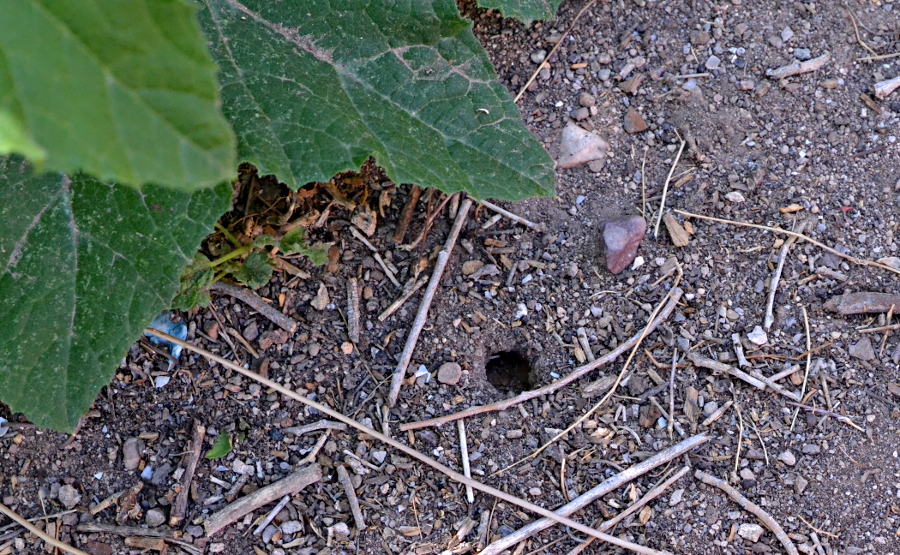
Squash bee nest hole
So how do you attract these wonderful creatures to your garden?  Plant squash, of course, and have some bare, untilled dirt next to the squash for the nests.  Read more!

Monday, June 5, 2017

Climate, Micro-climates, and Nano-climates


This turned into an accidental demonstration of what micro-micro-climates are.  A micro-micro is a nano ... so maybe I'm showing nano-climates.  If you have a few plants that are unexpectedly struggling when the rest of the same variety are thriving, check for tiny differences in light and water.

EXAMPLE: Here are three young summer squash, looking quite water-stressed in the early afternoon.
Wilted
Less than 6 feet to the north, at the same moment, another three squash looking perky.
Unwilted
They were started and planted out at the same time, the seeds came from the same packet, the growing medium is the same home-made compost and silty sand, and they have the same length of drip tubing from the same manufacturer coiled around them.

The difference? The three to the north get light shade from a branch about 20 feet above them in the early afternoon. The stressed ones do not.

The solution? I added more drip tubing for the stressed ones.

I've seen nano-climates like this come from a window or wall reflecting light and heat, a septic tank's microbiological action warming the soil, or a change to a neighbor's landscaping giving more or less sunlight.

https://en.wikipedia.org/wiki/Microclimate 


Read more!

Friday, May 12, 2017

Weed Control: Herbicides 101, What Plants They Kill


Herbicides are chemicals used to control unwanted plants. All conventional or "organic" herbicides work by somehow interfering with plant growth. They may block photosynthesis and protein production, dry out the leaves, or destroy or inhibit root formation. Because different plant groups have different biochemical pathways, some herbicides can kill only one group and leave other groups unaffected. Other herbicides will kill a wider range of plants.

This means that you might be able to get rid of some plants and not kill the plants you want to keep.  But it also means you have to take the time to find the right herbicide, read labels and apply the herbicide correctly.
WARNING: If something will kill "weeds", it might also kill "flowers", "lawns", "vegetables", "shrubs", "trees", "animals", and you.
Read the labels before you buy a product or open the container. Follow the instructions. What has been sprayed can't be unsprayed.

READ THE LABELS: Yes, that means YOU!

A typical herbicide label has several pages of cautions and warnings and instructions.  The label will tell you how to safely handle the product, what plants to use the product on, and just as important, what not to use it on. You can read the labels online while you are deciding which product you need.
Label from typical lawn weed killer.
They tell you what NOT to apply it to because it will kill those plants.

There is also a long list of weeds it has been tested against that it will kill
if you apply it according to the package directions.

What are you killing, and for how long do you want it dead?

Classified by results, herbicides can be thought of as soil sterilizers, broad spectrum herbicides, broad-leaf herbicides, grass herbicides, and pre-emergent herbicides.  So your first step is to decide what effects you need, and identify the plants you want to kill. Then you can select which product of that class will work best for you.

Soil Sterilizer
A soil sterilizer prevents seed sprouting and regrowth from roots for a long period, months to years.  It usually kills existing plants as well.  This is the equivalent of "nuke it from orbit" for a gardener, and should be very carefully researched.

This is not the product you want to apply to clear the weeds from where you plan to put a lawn or vegetable garden.

Broad Spectrum Herbicide
Affects almost every plant you spray, but will not prevent seeds from sprouting, or only has a short effect on seed sprouting. These are useful for killing off everything and replanting with the desired species. With care they can be used around established plants without harming them.

Glyphosate is in this class, as is horticultural (20%) vinegar, and that stupid mix of salt, vinegar and dish soap. 

Broad-Leaf Herbicide
Affects most plants with two seed leaves, also known as broad-leaf plants, but does not affect plants with one seed leaf, such as grass and corn. This is what you get in the herbicides to kill weeds in lawns.


TIP: Not all plants with grass-like leaves are immune to this class of herbicide.  Some are not botanically a "grass" and others are just delicate varieties of a grass.

Grass Herbicide

This affect plants with one seed leaf or thin leaves, such as grass and corn, but does not affect plants with two seed leaves. These are useful for killing grass in your shrubbery and rose beds or an orchard.

Pre-Emergent Herbicide
This is often sold as a "weed preventer" because it sounds more appealing than "pre-emergent herbicide".  However it is labelled, it will prevent most seeds from germinating, so don't try to use it to keep weeds from sprouting in the vegetable bed or lawn you just seeded.


TIP:Timing is everything with pre-emergents. Applied too early or if there is too much rain and the herbicide might be washed below the level where the seeds are germinating. Applied too late and the weeds can be too mature to be affected.

On-Line References

https://en.wikipedia.org/wiki/Herbicide

http://extension.psu.edu/pests/weeds/control/introduction-to-weeds-and-herbicides/safe-herbicide-use 

http://extension.psu.edu/pests/weeds/control/introduction-to-weeds-and-herbicides/herbicides

http://www.ocregister.com/articles/plants-80501-weed-herbicides.html  Read more!

Monday, May 8, 2017

Using Compost Bins As Raised Beds

My composting method consists of tossing stuff into a wire bin and letting it decompose on its own schedule.  Because of the dry climate, things in a bin can sit there for years without decomposing much, so I ran a drip line onto the top to keep the ingredients moist and ensure compost within my lifetime.

Then we had the brainstorm!  Why not try growing stuff in the bin while it was decomposing? It has water and nutrients aplenty. It should be like a planter or extra-high raised bed.

The Construction:

Here's a new bin, made after yard cleanup, with layers of shredded branches, grass clippings,  and oleander leaves and blossoms.  The green thing is a bean plant that grew up the side between filling the bin and making the planter.
New Compost Bin

We made a depression in the middle of the material, lined it with newspaper and filled it with some garden dirt.
Layer of newspaper and dirt
Then we spiraled the drip line on the dirt and planted vegetables along the perimeter.
Drip line

Results

We had success with summer squash and tomatoes.  It's convenient to have tomatoes at a pickable height.
Matt's Wild Cherry Tomato, running wild

Problems

  • As the material decomposed, the plants needed to be adjusted for the lower height if they were draped over the edge.
  • The compost from the tomatoes was infested with tomato seeds from the fruits we didn't see that fell into the bin.
  • Tearing down the heap was a bit more difficult because of the massive root systems the plants developed, but not enough to make me stop using the heaps.
Read more!

Wednesday, April 26, 2017

Starting Seeds Under Grow Lights

The mortality rate of seeds that I plant directly into the garden is high. I blame it on the arid climate, because it is difficult to keep the soil moist for the time it takes to get the seeds well-sprouted.  The solution is to start seeds inside in soil blocks and plant them out when they have a couple of good leaves and some roots.

LED grow lights are fabulous for this. They are low-power and don't produce much heat so they don't cook the plants.


Don't let articles about basements full of reflectors and lights scare you off. There is a difference between growing plants all the way to flowering and fruiting and just getting seedlings started.  My setup won't get tomatoes from seed to harvest.  It will get them from seeds to seedlings and do it inexpensively.

This was the first "OMG, I need LIGHT, and I need it NOW" setup.  Two inexpensive grow lights are dangling from some steel tubing over my workbench. They have a timer set to provide about 14 hours of high intensity light every day.
Temporary Grow Light Area
You can see the mini greenhouses of salvaged transparent pastry and salad green boxes labelled with painters tape and permanent marker pens. The seedlings are in the boxes, protected from drying out.

The next version will have two more lights and more space, but will not be any fancier.  
WARNING and update: The air inside the plastic boxes CAN reach temperatures too high for successful seed germination.  I did not have problems when the workshop was a chilly 55 degrees, so I assumed that the set-up was working.  Later I started having entire boxes fail to germinate.  I was puzzled, then realized that I was not monitoring the temperature inside the boxes.  It was NINETY-TWO degrees in the box I measured.  That explains it.

I need to figure out how to keep the soil blocks moist and the temperature down.  There will be an update.

Why I don't use a sunny window

Sunny windows are for cats, not seedlings.
Read more!

Friday, April 21, 2017

Starting Seeds in Soil Blocks: Part 3, After They Sprout

They sprouted!  Now what? 

Unless you want the seedlings to die from lack of space for their roots, you have to do something with them.  You have three choices:
  • Direct planting out to your garden
  • Moving the sprouts to a larger soil block to grow larger
  • Moving the sprouts to a pot, either permanently or to grow larger
Read more!

Wednesday, April 19, 2017

Starting Seeds in Soil Blocks Part 2, Making and Planting the Blocks

Collect your trays for the soil blocks.  I use salvaged  clear plastic containers that salad greens or pastries are sold in. I also use small freezer containers to hold a 20-block set of seeds.  If you will be making large quantities of blocks, cafeteria style trays or nursery trays would be convenient if you have some way to retain moisture in the blocks.

You will also need a sturdy trowel, a drywall mudding blade, and a pair of tongs with flat 1-inch tips.
The tools: drywall knife, mason's trowel and salad tongs

Read more!

Monday, April 17, 2017

Starting Seeds in Soil Blocks Part 1, Making the Mix

Soil blocks - just a cube of compressed dirt - have advantages for gardeners who grow their vegetables and flowers from seed.
40 lettuce seedlings in 3/4" soil blocks
in a scavenged plastic deli tray
There is no plastic except for the reusable, perhaps scavenged, trays for the blocks.  The micro blocks shown here take a very small amount of space compared to other seed starting methods. If a seed fails to sprout, the block can be tossed into the garden or compost bin. When well-sprouted, after a couple of true leaves have developed, the seedlings are ready for planting out or moving into a larger soil block or a pot.
Read more!

Wednesday, April 12, 2017

Raised Bed: REV 2.0 Bigger and Better

The first raised bed was done in a hurry because it was already October and I needed to get something finished for winter vegetables.  It was about 6x9 feet, occupying the available space between a fence, shed, and compost bins.
Six feet is as deep as it can be without getting in the way of traffic through the side yard. However, six feet is too big to weed in the middle without crawling into the growing area. Four feet wide would have been much better, because a comfortable reach for me is 2 feet.

Geometry to the rescue! The new bed is a fat E-shape, 6x16 feet, with two indented areas to keep the entire growing area in my reach distance. It is, however, no longer "tool-free".
Old (top) and new (lower) bed outline

Read more!

Friday, April 7, 2017

PRO and CON: Expanding Pot-Pellets for Seed Starting

I sometimes start seeds in expanding starter pots. The most widely available brand is Park Seed Company "Jiffy-7" pots. The Jiffy pots are widely available in garden centers, the garden section of large retailers and hardware stores. They don't work for all seeds, but it's a product that is worth considering for starting some of your seeds.

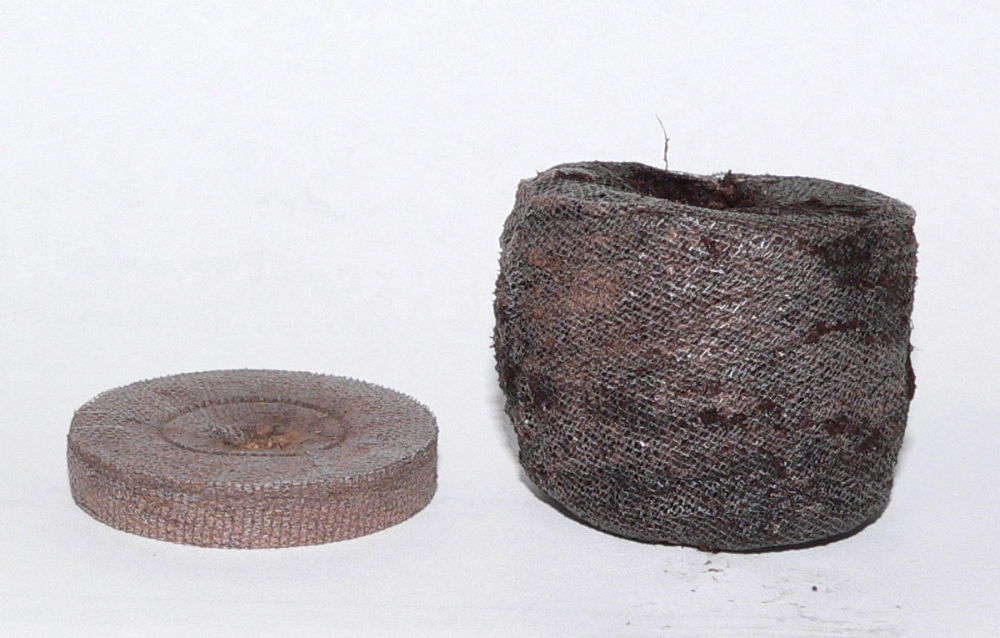
The poker-chip size disks inflate into seed starting pots when you soak the discs in warm water. After the disk has soaked up water and is about 1 1/2 inches tall, drop a couple of seeds into the hole in the pot and wait for something to grow. I haven't had this much fun since I was a kid and had those flat animal sponges that puffed up into horsies.
Expanding Pots: as purchased on the left, after soaking on the right

Read more!

Friday, March 31, 2017

Why you need a garden journal

I know what date I took a picture, because the camera dates them for me, but when did I plant those things? That's why I need to start a garden journal - if I'm going to make garden experiments, I need to document my projects better.
Nice lettuce on February 20, but when did I plant them?
Here's where I should wax rhapsodic over the joys of using a hand-bound journal with a vintage nib pen for my botanical musings, or launch a discussion of which garden journalling software works best for Mac, Windows and Linux or my smart phone. Or maybe discuss my search for an app that keeps my gardening data in the cloud, whatever and wherever that is.

But I'm not going there.

My main computer lives in my office and my gardening all happens outside or in the workshop. I have a not-so-SmartPhone and I don't want to risk my laptop in the garden.  I already have the property dimensions on graph paper, and the Weather Underground keeps track of weather history for me. I don't need to track every weed I pull, just a few significant dates like when I plant seeds and when I need to do certain tasks, such as check on the seeds I have chilling in the refrigerator.

The simplest solution is a calendar page with enough room to make notes, in a clipboard that hangs in the workshop. At the end of a month, the loose page will be archived into the big binder that has all my house notes.

Here's the journal page I picked, from a wonderful group I know nothing about except that they provide free calendar templates for Linux, Mac and Windows.  Download what you need and print them out.  If I need more room for notes in any month, I will staple a piece of lined paper to that month's calendar.
Monthly calendar with note area
2017 Calendar Template Download 
And here it is, in front of my extremely sophisticated grow light system. The upcycled lettuce and pastry containers have soil blocks and seedlings in them.  ("Upcycled" sounds so much better than scavenged.)
Garden journal at work, collecting notes.
Read more!

Friday, March 17, 2017

Using a Seed Starting Heating Pad


Many seeds require a warmer soil temperature for germination than the seedling needs to grow after germination.  This ensures that the seeds germinate when the weather is warm enough for the plants to survive.
Frost on my lettuce seedlings.
For most seeds, directly planting the seeds in the garden is the preferred method, but many gardeners start some of their plants indoors with "bottom heat" to provoke germination and get an early start on the season.
  • They want to harvest as soon as possible, whether for market stalls or just bragging rights.
  • Their growing season is too short for this plant.
  • By the time the soil is warm enough, the remaining growing season is too short to get any harvest.
  • Their soil never warms up enough to germinate the seeds, but transplants will grow.
  • Their area for starting seeds indoors is too cool for germinating.
  • They need to get the plants germinated and seedlings established before hot weather arrives.
  • They want to get their garden work done before hot weather arrives.
I'm gardening in several of those categories, especially the last two.  I want to get the chili peppers and tomatoes in the ground to avoid the coming hot weather, and my workshop is too cool.
Read more!

Sunday, February 5, 2017

Late winter planting to avoid the spring rush?

The experiment - I'm exploring the possibility of starting leafy greens in late fall and "storing" them in the garden under a frost cloth during the winter so they are out of my way when I need the seed starting space for chiles (we have our priorities in this state).
If it works, I can have a three-planting rotation for leafy greens: Late fall for harvest in early spring, late spring for harvest in spring/summer, late summer for harvesting into the winter.

I planted out seedling butterhead lettuce in soil blocks December 3. Earlier plantings of chard, kale, bok choy and leaf lettuce - set out in beginning in early November - are looking happy and putting out leaves.  I've been harvesting since mid-January.  They are under a frost cloth tent, but it's not heated.
Bok Choi, planted as seedlings in December
Read more!

Saturday, January 7, 2017

No-Tool Frost Cover Supports for Tender Landscape Plants

We joke that the the classiest house in the Phoenix area looks like a low-class Victorian washerwoman's house when a freeze is coming, because Phoenicians grab anything at hand to cover plants (Check the images. The Superman sheets are fab!) when one of the rare freezes is coming.  King size sheets and muslin curtains are popular, propped up with anything from saw horses to dining chairs to keep the covers off the plants.  Plastic drop cloths are popular, but you can cook your plants under the plastic if you forget to take it off.

If you have a bit more time to prepare, or live where frost protection is needed several times a winter, try this inexpensive solution that won't leave you sitting on the floor with no sheets on the bed. It looks like an old-fashioned circus tent.
Frost Cloth and Rebar Tent
Read more!

Tuesday, January 3, 2017

Four Cheap, Effective Fertilizers

For Occasional Use by a Lazy Gardener

I seldom use fertilizers, but if I have to, I use the simplest ones that will do the job.  I am reluctant to use combination fertilizer and weed killer or pest killer. If landscaping has weeds or pests, I'll buy the right single-purpose product. I am also reluctant to apply "time-release" products because in my experience, they are timed for the typical Eastern lawn and garden with more rainfall.
1914 Fertilizer Brochure Cover
If a landscape that I'm responsible for needs fertilizer, one of these four fertilizers will be applied: ammonium nitrate, ammonium sulfate, ammonium phosphate, or soil sulfur. In keeping with my gardening philosophy, they are the simplest, cheapest fertilizers you can buy.
Read more!

Monday, December 12, 2016

Manual Weed Control Methods: Hand Pulling and V-Weeders


There is something deeply satisfying about grabbing a fistful of weeds and yanking them out, roots and all. However, you have to make sure you aren't just pulling the leaves off because the weeds will regrow.  The soil should be damp, either from a heavy rain or recent watering.  If it's too wet you will yank out huge clumps of dirt with the weeds, and if it's too dry the roots are locked into the dry dirt.

Best Technique:  Grasp the entire plant at the base, holding all the leaves in your hand and rotate it as you pull up.  If things go right, you should pull out an intact tap root.  If you are just breaking the tops off, water the area and try again in a couple of days, or use a V-weeder.

NOTE: Most annual plants have a growth point at the base of the leaves that can regenerate leaves. Slice below this point or the weed has a chance of growing again. 
Growth point: be sure to get this and the top inch of the roots.


Read more!