Showing posts with label wildflowers. Show all posts

Monday, January 7, 2019

Jute Erosion Mesh: Lawn Upholstery Part 2

It Finally Begins to Biodegrade


Almost 2 years ago, I covered the front yard with jute mesh to keep the grass seeds from blowing away or drying out. It worked as intended, but it's taking longer than I expected to degrade.

The mesh in the dryer areas of the yard (where the grass is thinnest) is still quite strong. The mesh where the grass was thickest has almost completely vanished. In a wetter climate, or if I had watered the grass more, it would have all vanished by now.

Raking the leaves this spring was tricky because the mesh was still strong enough to snag the rake tines. This winter the mesh is there, but although it looks intact it has most of its strength. I raked up small shreds and an occasional tangle of strings as I raked the dead grass and leaves.
The last of the erosion control cloth
 I'm tossing leaves, mesh and dead grass into the compost bins. By this time next year they will be ready for adding to the vegetable garden’s raised beds.


Read more!

Thursday, July 6, 2017

Watching Grass Grow: Buffalo 2.0 Is Now a Meadow

A meadow is grass with wildflowers ...and I have it!  At least in parts of the lawn, if you squint just right, I have fluffy clumps of grass with scattered flowers.
Jute mesh, new grass, and some wildflowers (Ratibida columnaris)
It's been slow to establish for several reasons:
  • We had a cooler spring than usual.
  • The summer rains have not come yet.
  • I did not till or amend the area before planting.
  • The seeds are not a select improved "turf" strain, it's just generic buffalo grass and blue grama grass. 
  • I fertilized very lightly and did not fertilize early.
  • Most of the wildflowers are perennials and will not bloom well this year. 
The erosion control mesh is doing exactly what I need it to do - when I water the mesh fills with water like waffles fill with syrup and it sinks in instead of running off.  I am watering daily to encourage the final grass seeds to sprout, with an occasional seep watering to get the roots to go deep.  I really need some rainstorms. Read more!

Friday, June 16, 2017

Flowers! And Bugs!

Enough of construction and problem solving!  I have flowers to brag about ... Russian sage, hollyhocks, penstemons and gaillardia blooming between my patio and the fence in a gaudy mess.  
This is the traditional New Mexico style flower garden, where you plant a lot of things and let them fight for room. My long term plan is to extend this planting along the fence to the right, as time and available compost permit.

The Russian sage has dozens of bees, and an occasional butterfly.  These cream or white ones with spots are common.  An orange sherbet colored one taunts me and dodges the camera.
 

And on another wall, Zebra hollyhocks (Malva sylvestris) in a small planting area between patio and barbecue grill. There are also gaura and salvia for the hummingbirds.
 
Read more!

Monday, May 29, 2017

Watching Grass Grow: Buffalo 2.0 Update

Just a quick update on establishing the buffalo and blue grama lawn. It looked like this in early February, right after I spread the jute mesh and scattered the seeds.
February 2, 2017
After way too much weeding and daily hand watering, by late May I had grass and an enthusiastic crop of native wildflowers.  Two annuals -  Tahoka daisy (Machaeranthera tanacetifolia) and sunflowers - are the main ones now. The perennial species are still very small.
May 27th
The daisies were not deliberately planted. They blew in from somewhere and I decided to keep them. They have a long bloom period, reseed easily, and attract a small white butterfly.
Tahoka Daisy
The native grasses don't grow very tall at first. They are establishing roots. When the summer rains come, I expect to see the buffalo grass sending out runners and the blue grama bunches get taller.
Tufts of grass
Read more!

Friday, May 12, 2017

Weed Control: Herbicides 101, What Plants They Kill


Herbicides are chemicals used to control unwanted plants. All conventional or "organic" herbicides work by somehow interfering with plant growth. They may block photosynthesis and protein production, dry out the leaves, or destroy or inhibit root formation. Because different plant groups have different biochemical pathways, some herbicides can kill only one group and leave other groups unaffected. Other herbicides will kill a wider range of plants.

This means that you might be able to get rid of some plants and not kill the plants you want to keep.  But it also means you have to take the time to find the right herbicide, read labels and apply the herbicide correctly.
WARNING: If something will kill "weeds", it might also kill "flowers", "lawns", "vegetables", "shrubs", "trees", "animals", and you.
Read the labels before you buy a product or open the container. Follow the instructions. What has been sprayed can't be unsprayed.

READ THE LABELS: Yes, that means YOU!

A typical herbicide label has several pages of cautions and warnings and instructions.  The label will tell you how to safely handle the product, what plants to use the product on, and just as important, what not to use it on. You can read the labels online while you are deciding which product you need.
Label from typical lawn weed killer.
They tell you what NOT to apply it to because it will kill those plants.

There is also a long list of weeds it has been tested against that it will kill
if you apply it according to the package directions.

What are you killing, and for how long do you want it dead?

Classified by results, herbicides can be thought of as soil sterilizers, broad spectrum herbicides, broad-leaf herbicides, grass herbicides, and pre-emergent herbicides.  So your first step is to decide what effects you need, and identify the plants you want to kill. Then you can select which product of that class will work best for you.

Soil Sterilizer
A soil sterilizer prevents seed sprouting and regrowth from roots for a long period, months to years.  It usually kills existing plants as well.  This is the equivalent of "nuke it from orbit" for a gardener, and should be very carefully researched.

This is not the product you want to apply to clear the weeds from where you plan to put a lawn or vegetable garden.

Broad Spectrum Herbicide
Affects almost every plant you spray, but will not prevent seeds from sprouting, or only has a short effect on seed sprouting. These are useful for killing off everything and replanting with the desired species. With care they can be used around established plants without harming them.

Glyphosate is in this class, as is horticultural (20%) vinegar, and that stupid mix of salt, vinegar and dish soap. 

Broad-Leaf Herbicide
Affects most plants with two seed leaves, also known as broad-leaf plants, but does not affect plants with one seed leaf, such as grass and corn. This is what you get in the herbicides to kill weeds in lawns.


TIP: Not all plants with grass-like leaves are immune to this class of herbicide.  Some are not botanically a "grass" and others are just delicate varieties of a grass.

Grass Herbicide

This affect plants with one seed leaf or thin leaves, such as grass and corn, but does not affect plants with two seed leaves. These are useful for killing grass in your shrubbery and rose beds or an orchard.

Pre-Emergent Herbicide
This is often sold as a "weed preventer" because it sounds more appealing than "pre-emergent herbicide".  However it is labelled, it will prevent most seeds from germinating, so don't try to use it to keep weeds from sprouting in the vegetable bed or lawn you just seeded.


TIP:Timing is everything with pre-emergents. Applied too early or if there is too much rain and the herbicide might be washed below the level where the seeds are germinating. Applied too late and the weeds can be too mature to be affected.

On-Line References

https://en.wikipedia.org/wiki/Herbicide

http://extension.psu.edu/pests/weeds/control/introduction-to-weeds-and-herbicides/safe-herbicide-use 

http://extension.psu.edu/pests/weeds/control/introduction-to-weeds-and-herbicides/herbicides

http://www.ocregister.com/articles/plants-80501-weed-herbicides.html  Read more!

Monday, May 1, 2017

Watching Grass Grow: What I Should Have Done for Buffalo 2.0

This is another "Oops, should have thought a bit longer" post. I realized too late that there was a slower but less work way to get the front yard growing.

I should have established the grass and wildflowers over 2 or 3 years, not just one spring, to make weed control easier.
  1. Water well, lure out and kill annual weeds by any means possible between November and May.  Flames, herbicides, tilling ... total war on weeds.
  2. Plant the buffalo and grama grass in May, with the jute erosion control mesh.  The seeds would sprout faster in the warmer weather.
  3. Get the grasses established the first summer, weeding and using herbicides as needed. Anything that is not a grass is the enemy at this time.
  4. If the weed pressure is low, plant wildflower seeds that fall and following spring. 
  5. If there are still a bazillion weeds, use a pre-emergent or  broad-leaf herbicide another year before planting wildflowers.
But, I was in a hurry, so I planted the buffalo and wildflower seeds in early spring, and the weeds took advantage of the water. They were well-sprouted before the grass even broke dormancy.

On the bright side, I have acquired excellent experience in hand-weeding large areas and recognizing weed versus wildflower seedlings.
Read more!

Wednesday, April 26, 2017

Starting Seeds Under Grow Lights

The mortality rate of seeds that I plant directly into the garden is high. I blame it on the arid climate, because it is difficult to keep the soil moist for the time it takes to get the seeds well-sprouted.  The solution is to start seeds inside in soil blocks and plant them out when they have a couple of good leaves and some roots.

LED grow lights are fabulous for this. They are low-power and don't produce much heat so they don't cook the plants.


Don't let articles about basements full of reflectors and lights scare you off. There is a difference between growing plants all the way to flowering and fruiting and just getting seedlings started.  My setup won't get tomatoes from seed to harvest.  It will get them from seeds to seedlings and do it inexpensively.

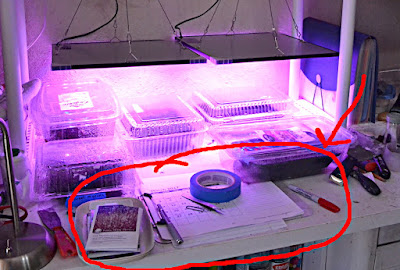
This was the first "OMG, I need LIGHT, and I need it NOW" setup.  Two inexpensive grow lights are dangling from some steel tubing over my workbench. They have a timer set to provide about 14 hours of high intensity light every day.
Temporary Grow Light Area
You can see the mini greenhouses of salvaged transparent pastry and salad green boxes labelled with painters tape and permanent marker pens. The seedlings are in the boxes, protected from drying out.

The next version will have two more lights and more space, but will not be any fancier.  
WARNING and update: The air inside the plastic boxes CAN reach temperatures too high for successful seed germination.  I did not have problems when the workshop was a chilly 55 degrees, so I assumed that the set-up was working.  Later I started having entire boxes fail to germinate.  I was puzzled, then realized that I was not monitoring the temperature inside the boxes.  It was NINETY-TWO degrees in the box I measured.  That explains it.

I need to figure out how to keep the soil blocks moist and the temperature down.  There will be an update.

Why I don't use a sunny window

Sunny windows are for cats, not seedlings.
Read more!

Friday, April 21, 2017

Starting Seeds in Soil Blocks: Part 3, After They Sprout

They sprouted!  Now what? 

Unless you want the seedlings to die from lack of space for their roots, you have to do something with them.  You have three choices:
  • Direct planting out to your garden
  • Moving the sprouts to a larger soil block to grow larger
  • Moving the sprouts to a pot, either permanently or to grow larger
Read more!

Wednesday, April 19, 2017

Starting Seeds in Soil Blocks Part 2, Making and Planting the Blocks

Collect your trays for the soil blocks.  I use salvaged  clear plastic containers that salad greens or pastries are sold in. I also use small freezer containers to hold a 20-block set of seeds.  If you will be making large quantities of blocks, cafeteria style trays or nursery trays would be convenient if you have some way to retain moisture in the blocks.

You will also need a sturdy trowel, a drywall mudding blade, and a pair of tongs with flat 1-inch tips.
The tools: drywall knife, mason's trowel and salad tongs

Read more!

Monday, April 17, 2017

Starting Seeds in Soil Blocks Part 1, Making the Mix

Soil blocks - just a cube of compressed dirt - have advantages for gardeners who grow their vegetables and flowers from seed.
40 lettuce seedlings in 3/4" soil blocks
in a scavenged plastic deli tray
There is no plastic except for the reusable, perhaps scavenged, trays for the blocks.  The micro blocks shown here take a very small amount of space compared to other seed starting methods. If a seed fails to sprout, the block can be tossed into the garden or compost bin. When well-sprouted, after a couple of true leaves have developed, the seedlings are ready for planting out or moving into a larger soil block or a pot.
Read more!

Friday, March 31, 2017

Why you need a garden journal

I know what date I took a picture, because the camera dates them for me, but when did I plant those things? That's why I need to start a garden journal - if I'm going to make garden experiments, I need to document my projects better.
Nice lettuce on February 20, but when did I plant them?
Here's where I should wax rhapsodic over the joys of using a hand-bound journal with a vintage nib pen for my botanical musings, or launch a discussion of which garden journalling software works best for Mac, Windows and Linux or my smart phone. Or maybe discuss my search for an app that keeps my gardening data in the cloud, whatever and wherever that is.

But I'm not going there.

My main computer lives in my office and my gardening all happens outside or in the workshop. I have a not-so-SmartPhone and I don't want to risk my laptop in the garden.  I already have the property dimensions on graph paper, and the Weather Underground keeps track of weather history for me. I don't need to track every weed I pull, just a few significant dates like when I plant seeds and when I need to do certain tasks, such as check on the seeds I have chilling in the refrigerator.

The simplest solution is a calendar page with enough room to make notes, in a clipboard that hangs in the workshop. At the end of a month, the loose page will be archived into the big binder that has all my house notes.

Here's the journal page I picked, from a wonderful group I know nothing about except that they provide free calendar templates for Linux, Mac and Windows.  Download what you need and print them out.  If I need more room for notes in any month, I will staple a piece of lined paper to that month's calendar.
Monthly calendar with note area
2017 Calendar Template Download 
And here it is, in front of my extremely sophisticated grow light system. The upcycled lettuce and pastry containers have soil blocks and seedlings in them.  ("Upcycled" sounds so much better than scavenged.)
Garden journal at work, collecting notes.
Read more!

Friday, March 17, 2017

Using a Seed Starting Heating Pad


Many seeds require a warmer soil temperature for germination than the seedling needs to grow after germination.  This ensures that the seeds germinate when the weather is warm enough for the plants to survive.
Frost on my lettuce seedlings.
For most seeds, directly planting the seeds in the garden is the preferred method, but many gardeners start some of their plants indoors with "bottom heat" to provoke germination and get an early start on the season.
  • They want to harvest as soon as possible, whether for market stalls or just bragging rights.
  • Their growing season is too short for this plant.
  • By the time the soil is warm enough, the remaining growing season is too short to get any harvest.
  • Their soil never warms up enough to germinate the seeds, but transplants will grow.
  • Their area for starting seeds indoors is too cool for germinating.
  • They need to get the plants germinated and seedlings established before hot weather arrives.
  • They want to get their garden work done before hot weather arrives.
I'm gardening in several of those categories, especially the last two.  I want to get the chili peppers and tomatoes in the ground to avoid the coming hot weather, and my workshop is too cool.
Read more!

Monday, March 6, 2017

Watching Grass Grow: Sprouting the Buffalo Grass Seeds

Instead of waiting until nights are reliably above 60 before seeding, I'm pretending that the grass seed is in Kansas and experiencing a nice wet spring.  I'm watering it every few days, and letting the jute mesh keep it moist.  Nights here are starting to be above freezing with days in the 50s and 60s and even 70s, so it should be happy to sprout.

(Feb 21)  3+ weeks after scattering seed and upholstering the lawn, a few days of rain, a couple days of snow, and temps ranging from highs of 45-75 and lows of 25-45 I have grass sprouting. 
 Tiny little shoots, but it's grass.
I don't know if this is buffalo grass or blue grama.
I also have weeds and perhaps some of the wild flower seeds are sprouting.  This area will take some time to sort out. Read more!

Thursday, February 23, 2017

Jute Erosion Mesh As a Seed Cover

Lawn Upholstering? 

Jute erosion control mesh is not burlap - it's a fabric woven with extremely coarse yarn and large holes.  The mesh is commonly used for erosion control along new road construction while grasses and shrubs are being established. It is biodegradable, and within a couple of years, maybe more in a dry area, will decay and turn into organic material in the soil.

I'm using it like a mulch to protect newly scattered buffalo and blue grama grass seed and native wildflower mix. It should prevent my seeds from blowing away, discourage seed-eating birds and hold moisture.  It is definitely weed-free, which my compost is not.  It supposedly decomposes in a couple of years, so I will write more than this post about how it works.
Upholstered Lawn

It does look like I carpeted the lawn, and the neighbors are looking at me funny.
Read more!